

When I worked in IT support (at Ionos – 1and1), we used to say that the biggest problem was between the chair and the keyboard. This is very true when it comes to WordPress, often decried as an insecure CMS. In reality, it is perfectly possible to secure your WordPress and make it extremely difficult to hack. You can do this by :
- actions to be implemented during installation (or later, but this is more complex),
- WordPress settings,
- setting up the environment (server),
- regular maintenance of your site.
Most of the points recommended here can be carried out directly and don’t require a great deal of technical knowledge. If you don’t feel at ease with them, you can use plugins, but this article will help you understand ‘why’ and therefore ‘how’ to set them up.
Work on a powerful and reliable technical
for all your future projects.
Let’s start with the basics
Most hacks are based on security holes in your out-of-date themes and plugins.
- Always update your plugins and themes (you can activate automatic updates, at least for minor updates).
- Limit the number of plugins installed on your site: even a deactivated plugin can be an entry point for a hacker, and therefore
- Delete any unused plugins and themes, and if you can, set aside a dedicated Wordpress site for your tests.
- Do not install nulled (cracked) plugins. Although WordPress plugins are under a GPL-license and can therefore be legally modified and redistributed free of charge, these plugins contain modifications to the code that may not be innocuous and, above all, they are updated later than the official version.
- Always opt for a strong password, i.e. one that is long enough, with numbers, letters and special characters such as # or !. There are some fairly simple mnemonic devices for remembering passwords. For example, iwB!o28!mai!poi can be memorised as“I was born on the twenty-eighth of May and I‘m proud of it” (which is wrong, as well as being an idiotic sentence) with three rules: capitalize the 3rd character, add a ! every three characters and transcribe the ‘numbers’ into figures.
You do this with your actual birthday, and it’s both unforgettable and very hard to guess.
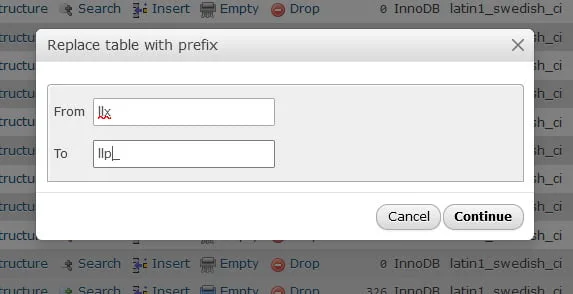
On installation: change the default prefix of your database
If you do your own installation, WordPress will suggest “wp_” as the basic prefix, i.e. the three characters that appear before the table names. The “posts” table will therefore be “wp_posts”.
By using a different prefix, you limit the possibility of hacking through sql injection (someone taking advantage of a flaw in a plugin to send an SQL query directly to your database).
My advice: use a prefix that means something, e.g. monblog followed by two _: myblog__.
Why should this be the case? Because if you have several installations on the same database, PhpMyAdmin groups together tables with the same prefix. Easier to view.
Correct the database prefix after installation?
It’s a bit complicated, because the database prefix is used in three different places, and if it’s not consistent, the site won’t work.
- In the wp-config.php file
- In the database
- In the fields of the wp_usermeta table, in fields whose names start with the basic prefix. If it is not modified in this table, the user (i.e. you) no longer has any rights! These fields include $prefix_capabilities, $prefix_user_level, $prefix_autosave_draft_ids and $prefix_user_roles, but some plugins or configurations may create others.
Modify the wp-config.php file
Save the file. Either download it and modify it with a simple text editor (notepad++ for example), or in your file explorer, cpanel or other, select it and click on modify.
You’ll find a line near the beginning that looks something like this:
$table_prefix = 'wp_';
and correct by
$table_prefix = 'afg__';
Now your site is broken. You’ll need to change the table names immediately
Change the prefix in the database
phpMyAdmin has a handy feature that lets you change the prefix of a set of tables in one go.
First, you make a backup of your database.
Select the tables, and in the list of possible actions, choose “Replace table prefix”.

In the window that appears you enter the current prefix without the _ (so not exactly the same syntax as in wp-config.php) and the new prefix. As I wanted to have two underscores, I only put one.
All that’s left is to be able to use the site!
Changing the metadata keys in the usermeta table
This is done with a simple SQL query:
UPDATE afg__usermeta set meta_key = replace (meta_key, 'wp_', 'afg__') where meta_key like 'wp_%'
The “LIKE” instruction, which is not very efficient and should generally be avoided, is used here to select all the metas concerned at once.
On installation: do not call the first user “admin” and secure his login ID
WordPress used to default to calling the first user admin. This made it easier to crack the site, all you had to do was find the password.
Today, choose a connection identifier that has nothing to do with your name or the name of the site. “JoeTheRabbit” for example… this will slow hackers down a lot more. .
And if you have an old “admin” user, you can change the “user_login” field in the wp_users table directly in the database.
Brute Force attack
As its name suggests, a ‘brute force’ attack doesn’t think things through, doesn’t try to exploit loopholes in a plugin or inject SQL into the database, it just sits on a chair in front of the login form and sends out a flurry of ‘username/password’ pairs to get in.
That’s why it’s so important to have a login that’s hard to guess and a strong password.
We’ll then put in place additional protections, all with the same objective: to slow the hacker down to the point where he’ll look elsewhere. Unless they have a personal grudge against you, they’re not going to spend hours trying to get onto your blog, as their primary objective is to create lots of rotten links (cialis, casino, etc.).
- hide user names: yes, it is possible to see a user’s login ID on the front-end.
- lose him: don’t use the usual urls, especially wp-login.php
- block him, preventing him from accessing certain files
- add extra passwords
- prevent them from trying to connect too often
Some of these methods are difficult to implement yourself and require a plugin.
Hide user names
First of all, you should avoid displaying the admin user. I always have two accounts on my WordPress sites: an admin user, who never publishes anything, and an editor user, who will publish, correct, etc (but who has far fewer rights). Of course, they don’t have the same login!
But there are other places in WordPress where user IDs can be found: the author archives. If, for whatever reason, you post a link for the author of an article (multi-author blog, upload to a biography to build authority), this link will display the login ID.
You can choose between two solutions:
- no author archive page
- change this identifier, using a database field that is not accessible in admin: user_nicename.
For some users, the easiest way is to do it manually, using PhpMyAdmin, otherwise there are plugins available.
Let’s imagine that my login is“redbandanna” and my user_nicename is“adrienb“. When the hacker brute-force tests all the possible combinations, he will get a 404 (i.e. a negative response) for the page with my author/redbandanna login, and a 200 (i.e. a positive response) for the author/adrienb page. He will exhaust himself trying every possible password combination for “adrienb”, which doesn’t exist.
On the other hand, if I don’t want to have an author archive page, all I have to do is send my hacker, via a php function:
if (!is_admin()) { // are we trying to display an author archive page?
if (preg_match('/author=([0-9]*)/i', $_SERVER['QUERY_STRING'])) die(); add_filter('redirect_canonical', 'hide_author', 10, 2); } function hide_author($redirect, $request) { if (preg_match('/\?author=([0-9]*)(\/*)/i', $request)) die(); else return $redirect; }
Change the login URL
Changing the default connection url (wp-login.php) is only really useful if you have a blog with few users. If you have to leave it visible (like the WooCommerce customer’s login url), this method loses its interest.
If you don’t want to use a plugin to do this, you must :
- create a new file to replace wp-login.php
- add php code to change the url.
Make a backup of your wp-login.php file at the root of the site.
Then change the name, for example to secret-access.php.
Using Notepad++,replace all the references in this file to wp-login.php with secret-access.php. (There are 14 of them).
Next, you need to prevent disconnected users from being redirected to the wp-login.php file.
This is done using the following filters:
//disconnect
add_filter( 'logout_url', 'secret_logout_page', 10, 2 );
function secret_logout_page( $logout_url) {
return home_url( '/secret-access.php'); }

// Request password recovery
add_filter( 'lostpassword_url', 'secret_lost_password_page', 10, 2 );
function secret_lost_password_page( $lostpassword_url ) {
return home_url( '/secret-access.php?action=lostpassword');}
Finally, if you want to completely hide this url, and for example make it so that you have to type “example.com/connection” to go to the access-secret.php file, you need to add a redirection rule to the .htaccess file (always via Notepad++ after a backup).
RewriteRule ^connection$ https://example.com/secret-access.php [NC,L]
Once you’ve tested everything, you can delete your wp-login.php file. The only drawback is that it will be recreated each time you update WordPress, so you’ll need to remember to delete it each time.
Or you can add a second redirect to the .htaccess file:
RewriteRule ^wp-login.php https://example.com/secret-access.php [NC,L]
Add dual login authentication
When we talk about double authentication, we immediately think of the bank that sends us an SMS confirmation code when we make an online purchase.
That’s fine, but it can also be problematic when you don’t have access to your phone, for one reason or another. What’s more, it’s a solution that requires an external plugin, and isn’t necessarily compatible with all WordPress plugins.
Add a server password to access wp-admin
You can protect a directory or a file on your site using the .htaccess file and a password file.
It’s very annoying for the hacker. He’s spent 20 minutes using brute force, he’s finally found the user/password combination, he thinks he’s finally entered the site… failed, he’s asked for a new password (with a different identifier, of course, otherwise it’s no fun).
To generate them, you can go through the “directory protection” on your CPanel, or do it by hand, in which case, at least for the first time, use a generator like this one. You enter the username and password, and click on “generate”. A line appears with the correct syntax: the user followed by the encrypted password.
totothehero:{SHA}eXIm+c5HG0kkq8qx4w51qE8goDY=You paste the line into a text file, you can add as many lines as you like! Save the file, .htpasswd exactly like this, or security.htpasswd, the important thing is the extension, and download it to your home/mdp directory.
All that remains is to add the necessary rules to an .htaccess file:
AuthUserFile /home/mdp/security.htpasswd
AuthGroupFile /dev/null
AuthName "Admin access"
AuthType Basic require valid-user
and place this.htaccess file in the root of wp-admin.
Or you can protect access to the login file by adding these lines to the .htaccess file at the base of your site:
<FilesMatch "secret-access.php">
AuthName "Admin access"
AuthType Basic
AuthUserFile /home/mdp/security.htpasswd
require valid-user
In this case, the hacker will have to get past this protection before accessing the hidden connection URL, which he will already have had trouble finding!
Securing your site with the .htaccess file
As you can see, the .htaccess file is a very important protection tool. The syntax I’ve given you can also be used for :
Disable the ability to view the contents of directories
In the main .htaccess file (at the root) add the following line :
Options -Indexes
Protect the wp-config.php file
This file is particularly sensitive, as it contains the database identifiers in clear text. To protect it, once again, a few lines in the main .htaccess file (at the root of the site) :
<files wp-config.php>
order allow,deny
deny from all
</files>
Protecting the .htaccess file
Yes, the .htaccess file can protect itself!
<files>
order allow,deny
deny from all
satisfy all
</files>
Disable XML-RPC
XML-RPC is an old technology, dethroned by the Rest API (in December 2016) which allowed WordPress to communicate with external applications. But like many things, the file still exists, just in case we need it. As it is a means of communicating with the outside world, it presents a certain risk, and the simplest thing to do is to prohibit access to it via our .htaccess file
order deny,allow deny from all
Disable PHP execution in certain folders
WordPress is using php, but some directories have no reason to contain .php files and hackers sometimes try to hide their viruses in these directories, i.e. the wp-content/uploads file.
To disable php execution in this directory, create a wp-content/uploads/.htaccess file with the following lines:
<files xmlrpc.php>
deny from all
</files>
In that case, you can … change your cache plugin!
Hide the version of WordPress used
This security measure is important, especially if, for good reason, you have an older version of WordPress. It’s visible in the readme.html file, which we’re going to block via the .htaccess file – you already know how to do that!
<files readme.html>
order allow,deny
deny from all
</files>
It also appears in the source code of all pages, in the header.
We need to add a function to our plugin:
function security_remove_version() { return '4.5'; }
add_filter('the_generator', 'security_remove_version');
(you can return an empty string, but it’s more fun to put a very old version number!
There’s still one place where the version number can appear: in the version of css and scripts!
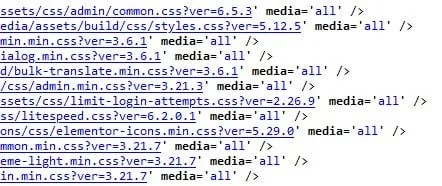
If no version is specified when the style or script is saved, the version displayed is the WordPress version! To avoid this, a simple code :
function security_remove_wp_version_strings( $src ) {
global $wp_version;
parse_str(parse_url($src, PHP_URL_QUERY), $query);
if ( !empty($query['ver']) && $query['ver'] === $wp_version ) {
$src = remove_query_arg('ver', $src);
}
return $src;
}

add_filter( 'script_loader_src', 'security_remove_wp_version_strings' );
add_filter( 'style_loader_src', 'security_remove_wp_version_strings' );
Disable display of PHP errors
This is normally the default configuration for a site in production. In fact, errors, particularly ‘Fatal Errors’, those that break the site, are accompanied by a detailed display of the files that have caused these errors, including their full path.
These errors need to be logged (so that you can access them and understand where they come from), but visitors need to be prevented from seeing them.
The method that works every time, whatever the server, is wp-config.php.
With this configuration, error display and logging is disabled.
define( 'WP_DEBUG', false );
define( 'WP_DEBUG_DISPLAY', false );
define( 'WP_DEBUG_LOG', false );
define( 'SCRIPT_DEBUG', false );
With this option, errors are logged in a specific file (example.com/tmp/wp-errors.log), but not displayed:
define( 'WP_DEBUG', true);
define( 'WP_DEBUG_DISPLAY', false );
define( 'WP_DEBUG_LOG', '/tmp/wp-errors.log' );
define( 'SCRIPT_DEBUG', false );
Disable file editing from the WordPress dashboard
Once again, a simple line to add to wp-config.php. There’s no reason to edit your theme and extension files from the WordPress admin! And if you make a mistake, you can completely crash your site. You’ll then have to go into cPanel to correct the file. You might as well go straight there!
define( 'DISALLOW_FILE_EDIT', true);
Make regular back-ups of your site
Don’t rely solely on your hosting provider, even if it does make back-ups. Firstly, they don’t keep them for very long, and secondly, they can have problems too (remember the companies that lost all their data in a fire in an OVH data-centre… which stored the back-ups in the same data-center).
You need to back up two things very regularly: your database and your wp-content directory.
Backing up your files
For the other files, make a backup of wp-config.php and .htaccess each time you modify them, and special files that you may have at the root, such as validation files for advertisers and Search Console, but you don’t need to backup them as often. Finally, the easiest way to “back up” the WordPress Core (wp-admin and wp-include) is to download the latest version from the wordpress.org site if you need it.
Plugins allow you to do this automatically, or you can do it manually. For sites that are important to you, spread your backups over one or two different hard drives, possibly in the Cloud.
Backing up the database
It’s easier to do because it’s a smaller file. I’ve automated this backup with All in One Migration (as well as making full backups of my sites).
Frequency of back-ups
It depends on your site and your business, but I recommend that you do at least one per week.
Very classic. But you can go much further if your project is really important (once a day for example, but be careful with your storage space!).
I suggest you host your backups in the Cloud, with, of course, double authentication to connect to them.
And, of course, a backup before each major change (implementation of my recommendations, change of theme, etc).
Testing your backups
We often forget… it’s good to back up, but it’s absolutely essential to check that you can use your backups. It’s happened to me that, because of a poor configuration, I ended up with a backup that I couldn’t reload.
So now, if I use a new tool, plugin or tool on cPanel, I test that I can restore everything.
Conclusion
And that’s it! Well, it’s a bit of a job, all the same. But at least your WordPress site will have very little chance of being hacked. That’s time well spent.
What I recommend you do to save time is to create a“Blueprint” or“Starter Site” that will contain all these security points. This will save you time by duplicating each new WordPress.
And if you want to save even MORE time, you can use mine (which contains lots of extra optimisations):